Have ya'll seen this nifty organization masterpiece called the Clip It Up? I just discovered it today! Too cool! I must add this to my Christmas list!
Also, if you go to this link and add a comment you will be entered to win one of these awesome do-dads for yourself!
Happy Organization!
Monday, September 27, 2010
Friday, September 10, 2010
Little Brother
.JPG)
This is one of my very favorite layouts. I love the torn pattern paper in the background - and I really love how I made the letters "L" and "B"! Inspired by a striped letter sticker I had (that wasn't the right letter or the right color for this layout), I decided to creat my own! I cut thin strip of coordinating paper then ran it through my Xyron and adheared it to a thin sheet of vellum. I made about a 3"X4" sheet of this striped paper. Then I put it in my Cricut to cut the letters I needed. I love the effect!
Happy Scrappin'!
Thursday, September 9, 2010
.JPG)
A visit to Nana & Pop's house is always fun, but on this particular visit, Pop surprised the kids with Big Wheels!! The kids has so much fun riding them, and we took so many pictures, that I knew this would have to be a 2-page layout. --But even then, how would I fit it all on just two pages?
On this layout I used coordinating paper from The Paper Loft. Using a solid background, I accented the page with stripes of patterned paper and the added a couple circles using dimensional adhesive. The title in the center was made using the Cricut Cuttin' Up cartridge. This simple layout left a lot of room for my pictures!
Happy Scrappin'!
Programs and Party Favors

.JPG)
.JPG)
.JPG)
.JPG)
For my MOMS group, I often volunteer to make prayer cards or book marks, or in this case, the programs and favors for our annual anniversary celebration.
For this project I had a limited budget... so I bought a pad of 12"X12" coordinating paper and kept it simple! Each program was 6"X6" so I could get 4 programs from each 12"X12" sheet of scrapbook paper. I printed the programs on regular printer paper and used my CM tearing tool to tear all the edges. (The light weight printer paper made this easier than tearing card stock!) I matched the ink color to the background paper.
For the favors, we bought Rosary CD's. I cut my 12"X12" paper into two 5"X12" stripe and two 1"X12" strips to make the "belt". I wrapped the 5"X12" paper around the CD, creased it, and added the belt and a coordinating flower embellishment.
Simple. Pretty.
.JPG)
Happy crafting!
Saturday, September 4, 2010
Portrait Album
.JPG)
For each of my kids, I have a "Portrait Album". I put all their studio or professional pictures in this album. Each album has a "cover" page. This is the cover page for Carter's portrait album.
I used the Cricut cartridges Mini Monograms and Opposites Attract to create the titles.
Happy scrappin'!
Garden
.jpg)
I am so proud of the little garden we have in our backyard - forget the fact that I don't have a green thumb. One year after my first attempt to grow something, we finally harvested our first crop of carrots! I was so happy I took a bunch of pictures!
Happy scrappin'!
A Mother's Notebook

This is a regular composition book that can be found at any office supply store. It's been covered with scrapbook paper to dress it up, personalize it, and make it pretty!
TIPS & TRICKS
- Cut your paper about 1" larger than the area that you are covering. Fold the excess over the edges of the front cover and adhear to the inside front cover.
- Cut another solid color paper slightly smaller than the area that you want to cover and adhear it OVER the folded over edges from step 1. This will keep the front cover very neat and tidy and the inside will also finished.
- Cut a 2" to 4" strip from contrasting paper to adhear to the left edge of the cover. This keeps to edge of your decorative paper neater and makes the overall look more finished.
This Mother's Notebook idea is credited to the amazing, sweet, and all around fabulous Carla Reeves of Sanity Journals. Carla led an journaling event with this concept and I must confess that while the outside of the journal is pretty, what she guided us to write inside the journal was truely amazing.
Faith & Friends Card
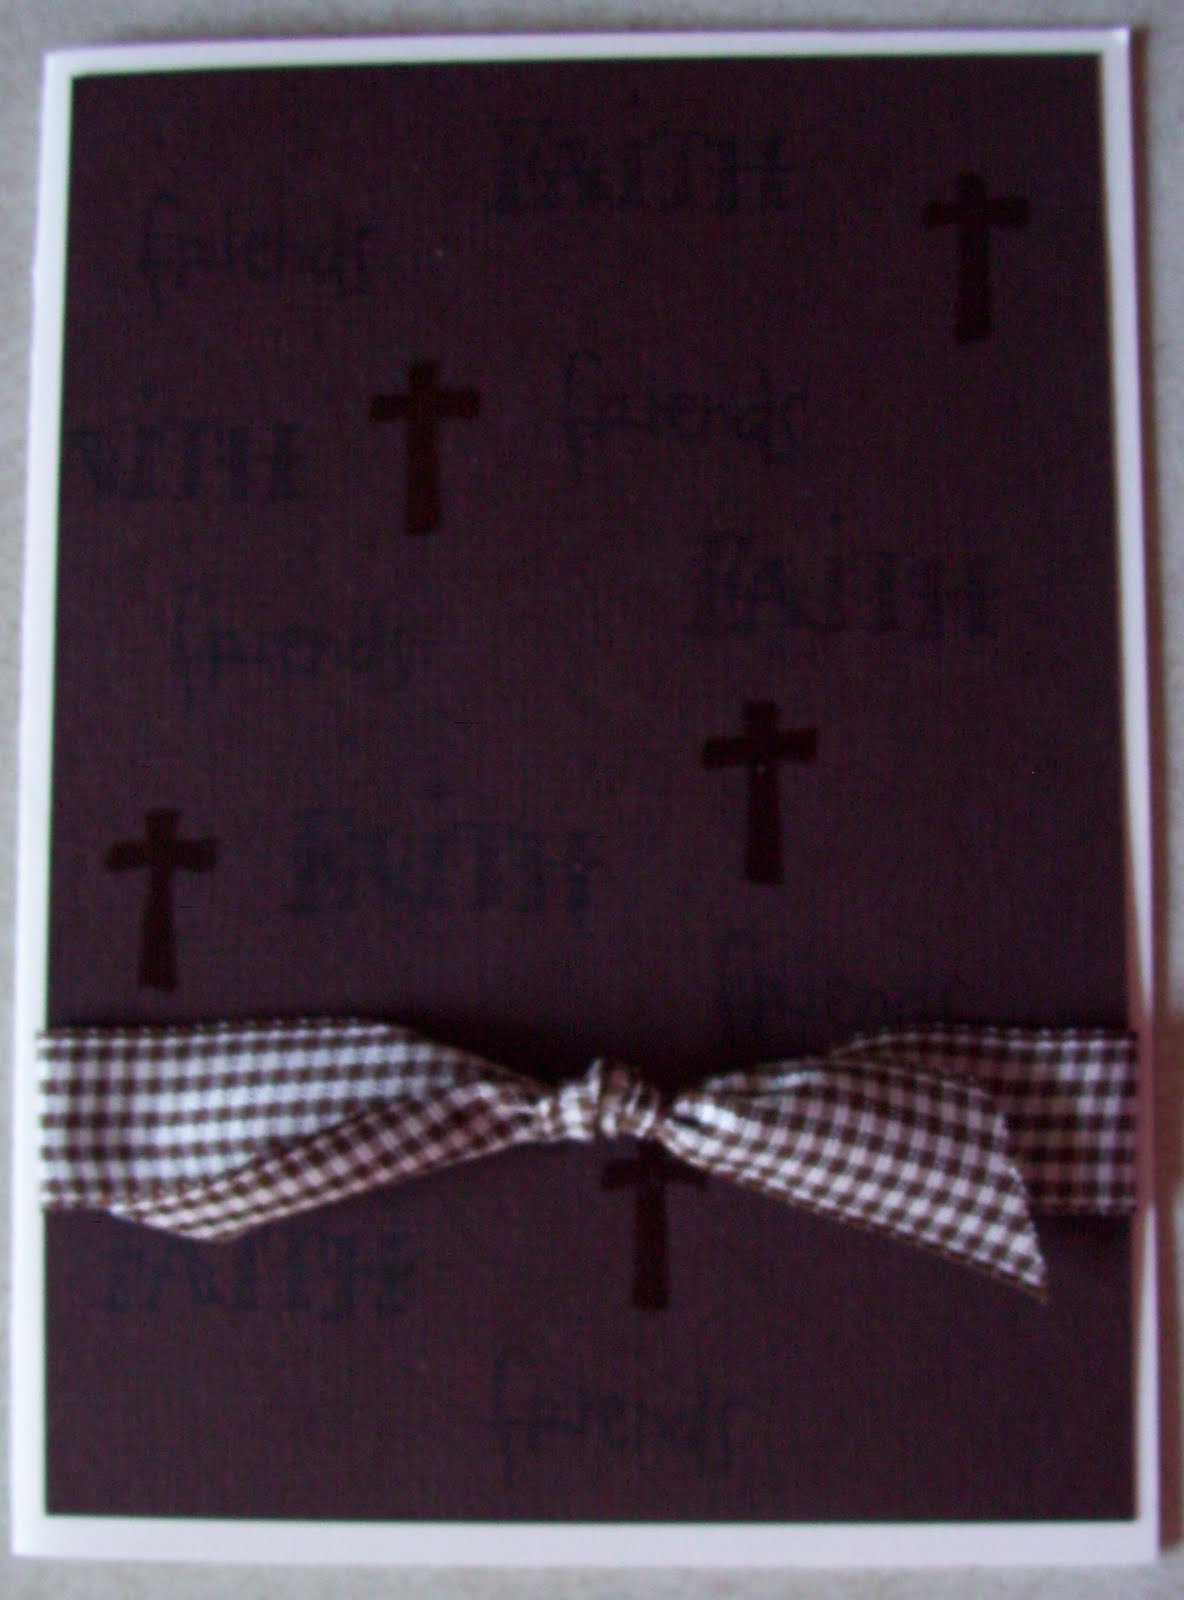
I used VersaMark to stamp on the dark brown card stock, then colored in the crosses with a glaze pen to add an extra highlight, added a matching ribbon, and voila! A quick and easy card.
If you are not familiar with VersaMark, you are missing out! VersaMark can be used with any of your stamps to give a watermark or tone-on-tone look. You can buy it at most craft stores for about $8. Stampin' Up! also sells VersaMark pens. I love VersaMark!
Happy Craftin'!
Me and My Family
.jpg)
One of my all-time favorite scrapbook layouts. This was 100% my creation. I used black as my contrast color and was amazed at how well it turned out! Even for a kids layout! The squares were made using two Creative Memories punches of slightly different sizes... Punch a small square, then punch again using a slightly larger square! (As always, turn your punch upside down to line it up before you punch.)
Happy Scrappin'!
Subscribe to:
Posts (Atom)